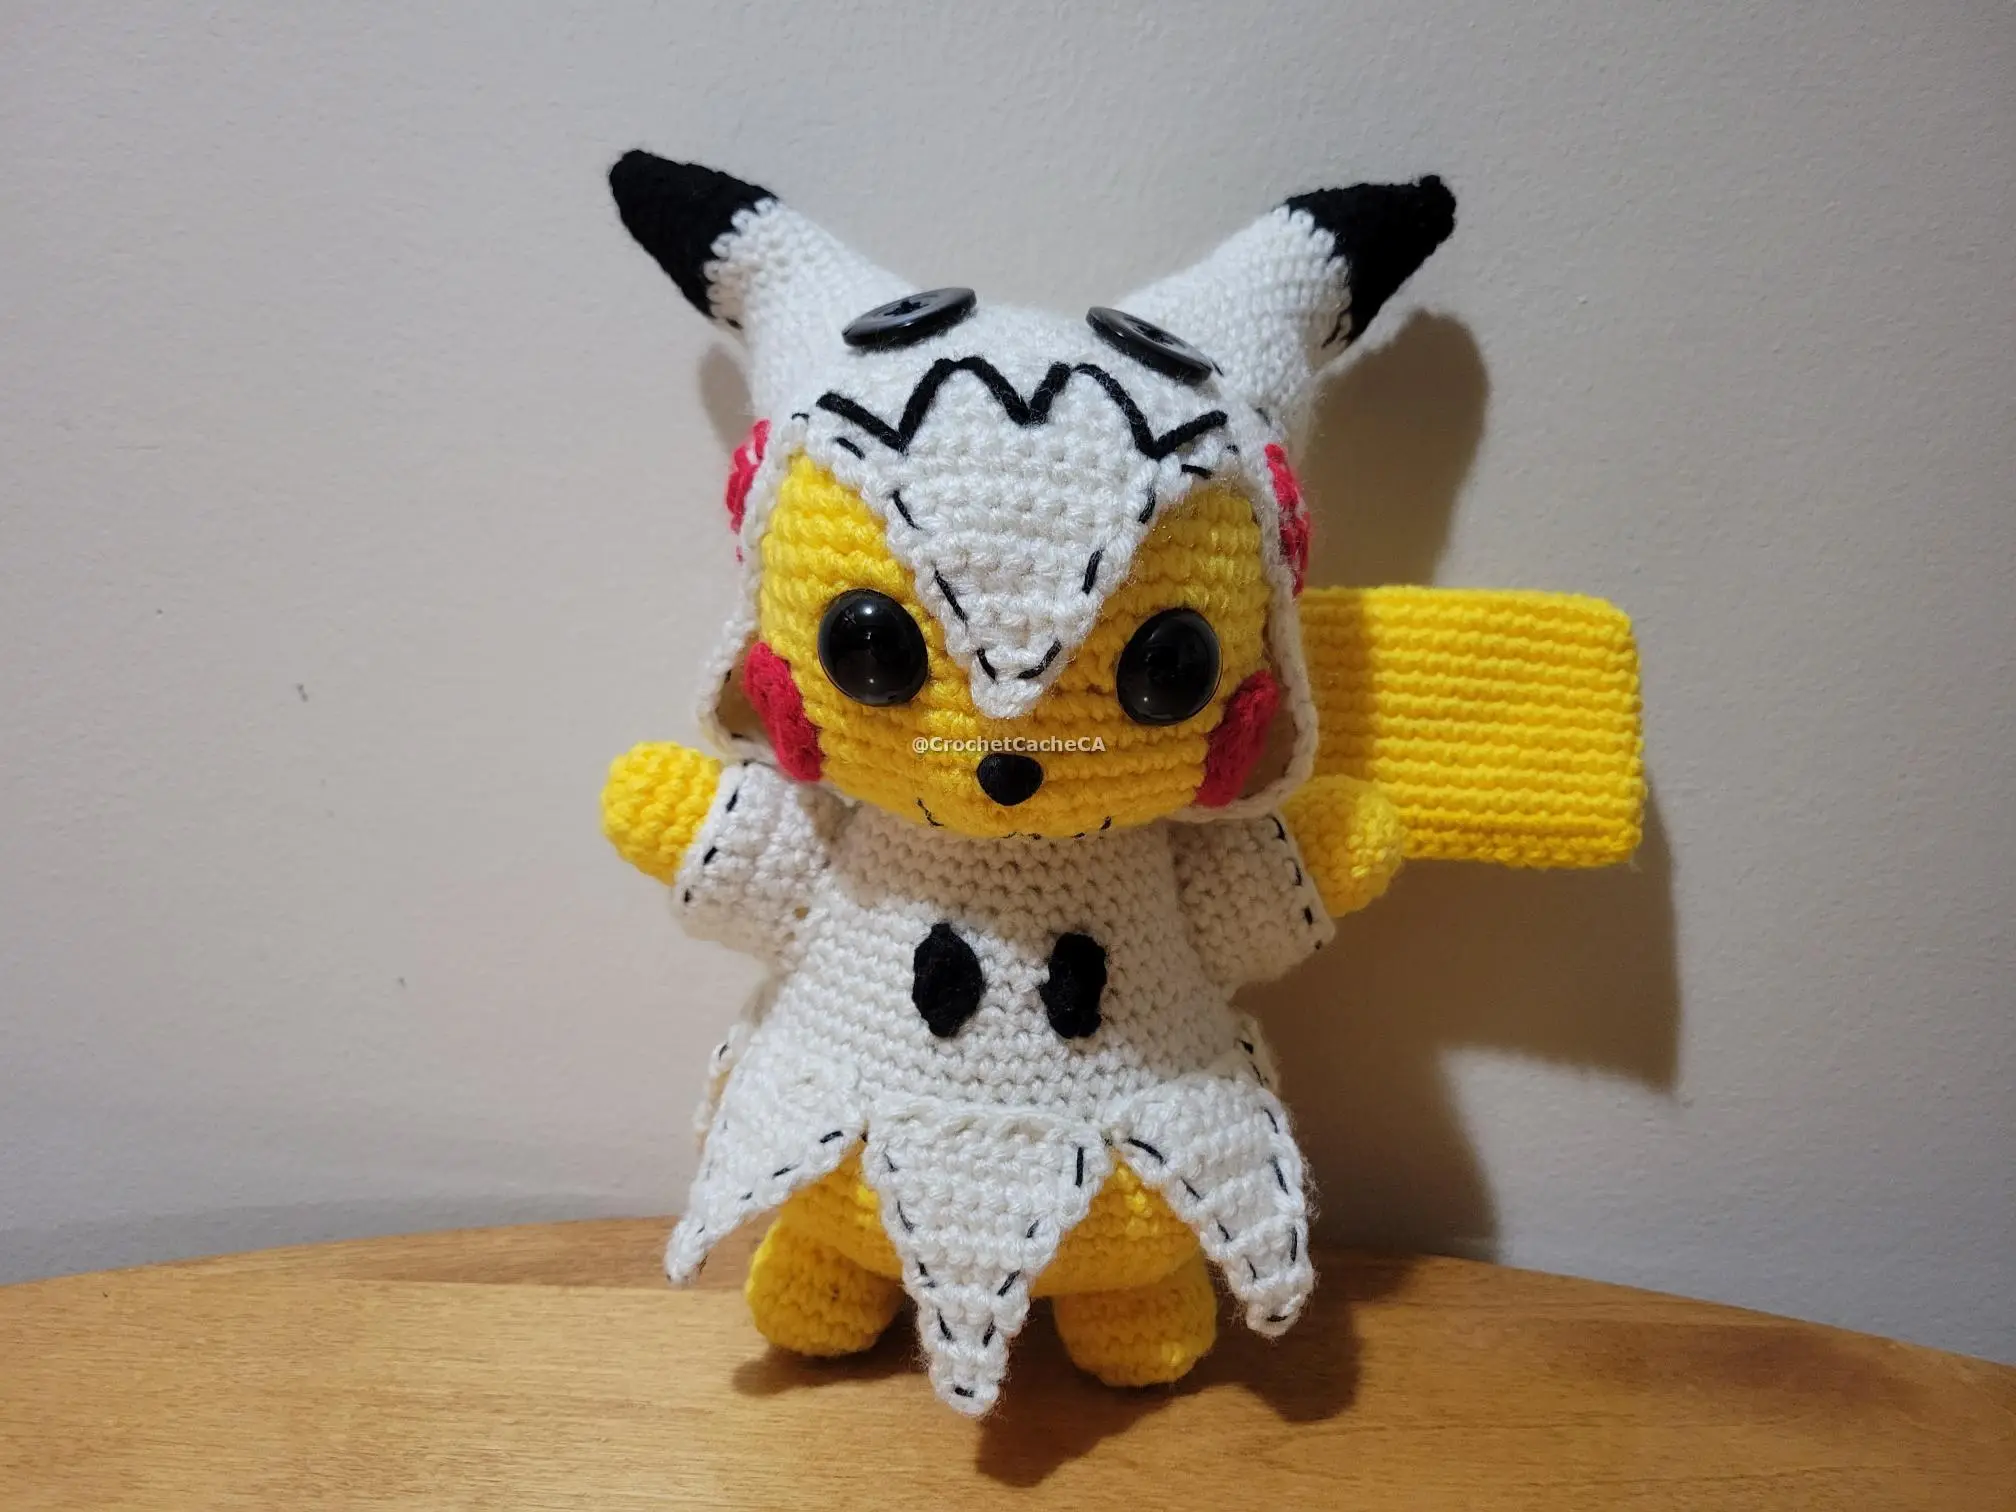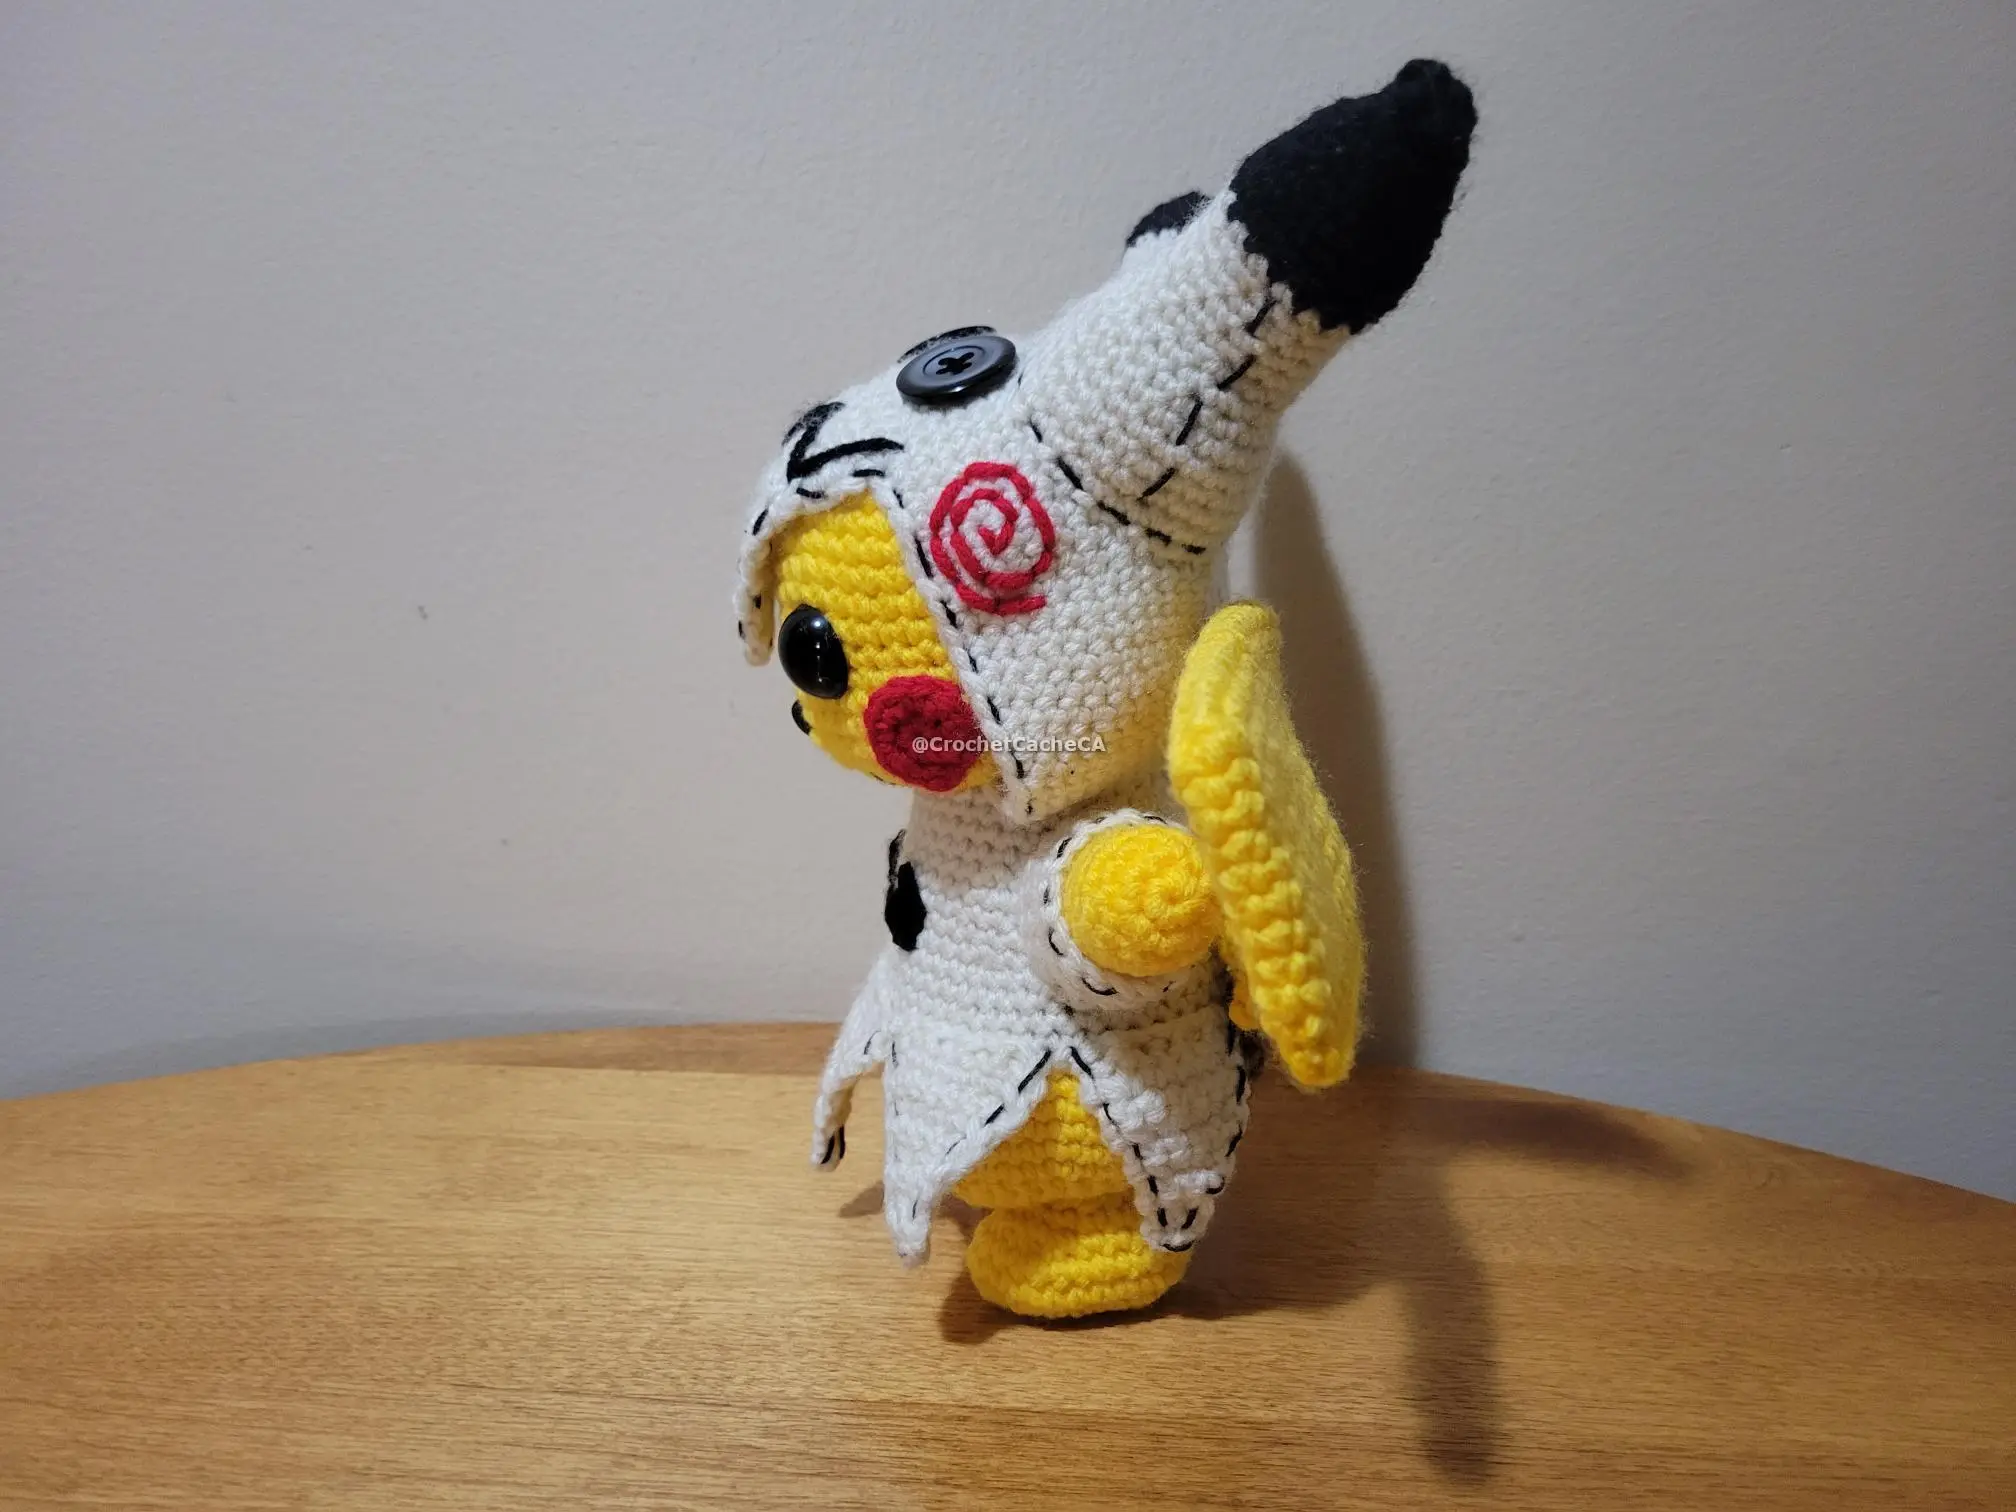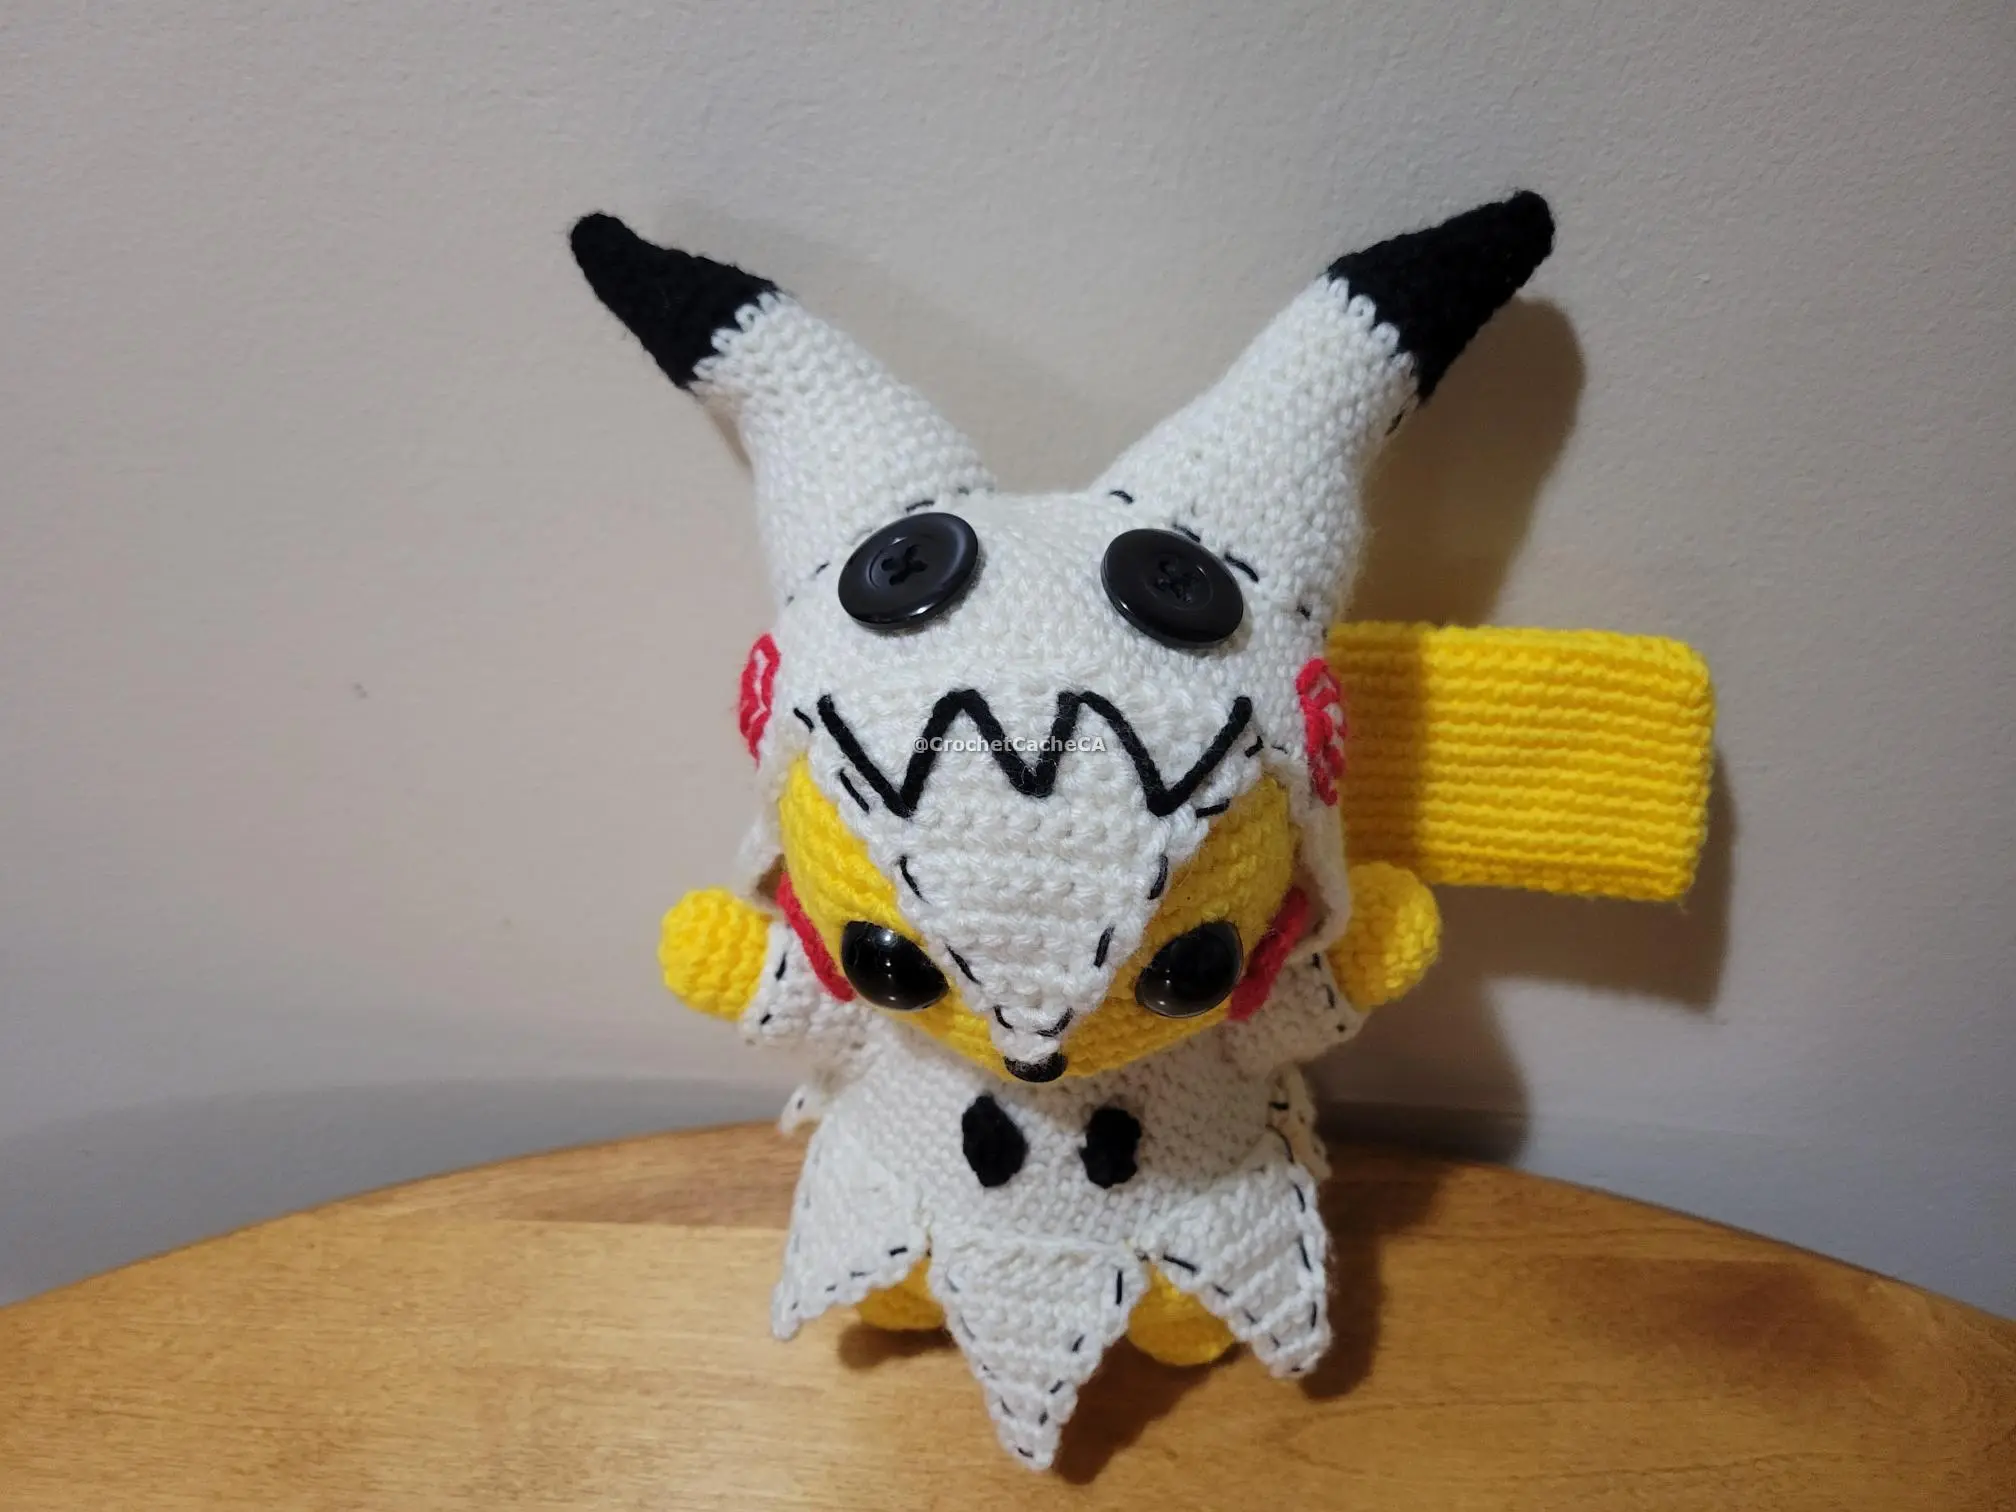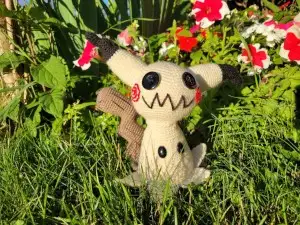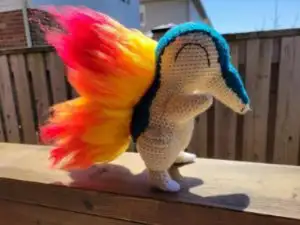
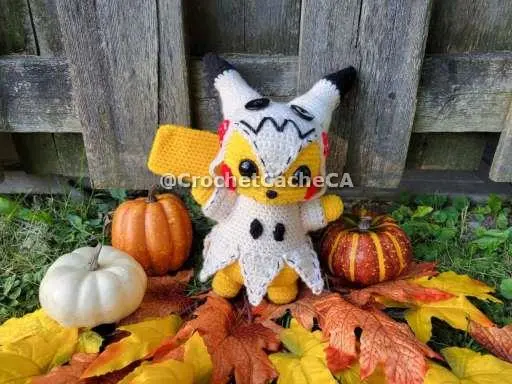
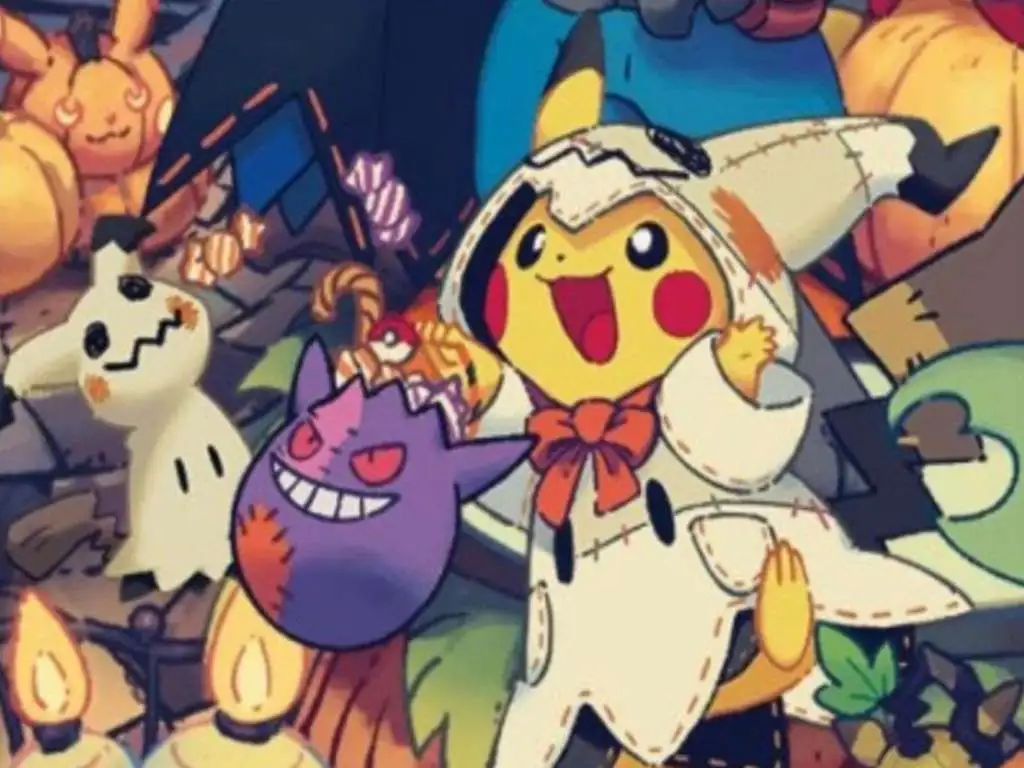
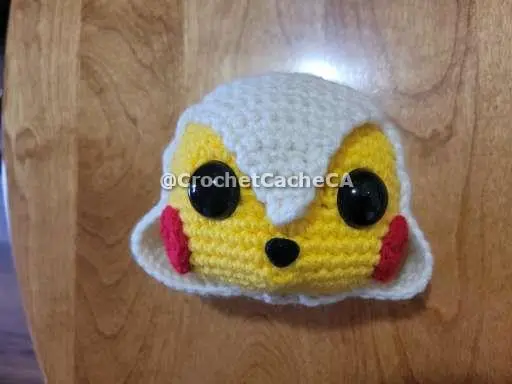
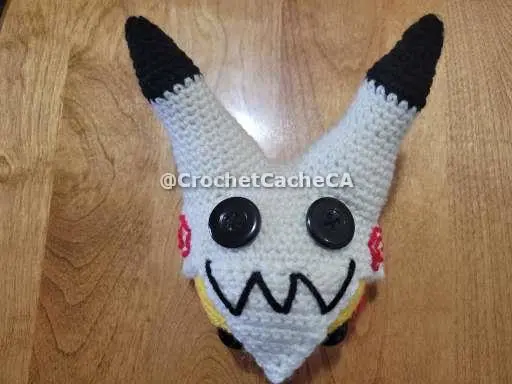
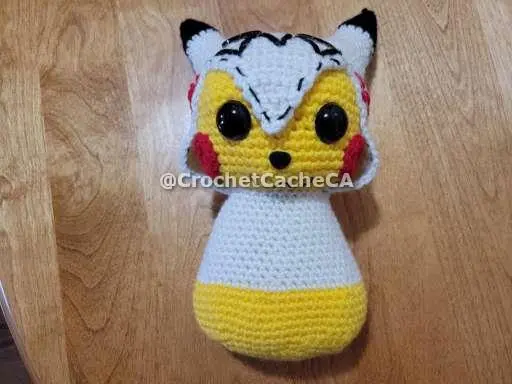
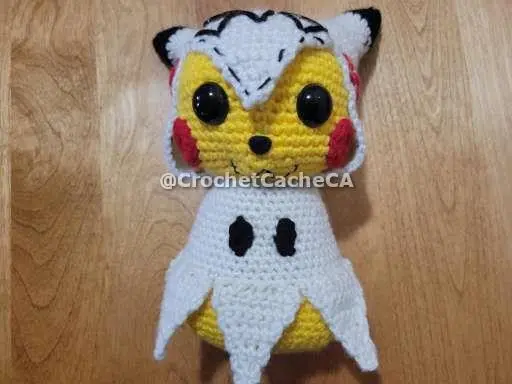
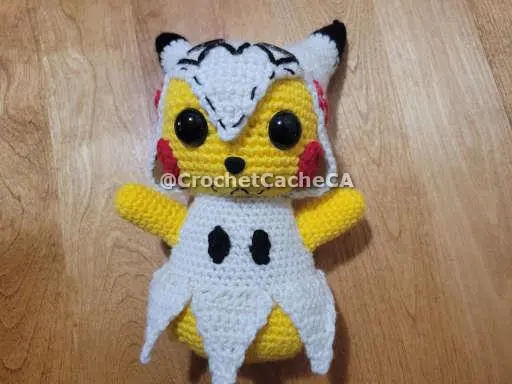
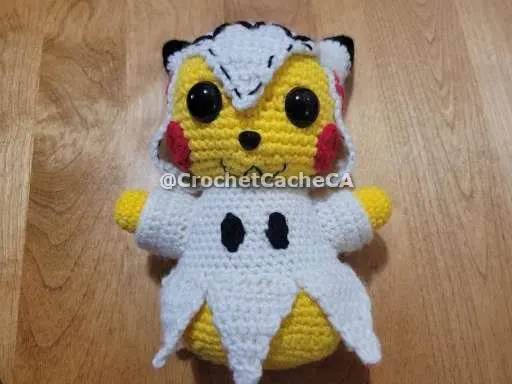
Pikachu in a Mimikyu Costume
|
Are you a Pokémon fan and a lover of the spooky time of year? Then this crochet pattern is the perfect fall project for you! This is pattern is a fan favourite in a costume of a Mimikyu, which normally copies Pikachu’s appearance. With his costume on, he is ready to trick-or-treat. In this post, I will show you how to make your own Pikachu in a Mimikyu costume amigurumi. This pattern is easy to follow but can be tricky on the assembly! If you have any problems or have general questions, please comment below or reach out on social media. If you do use this pattern, please @CrochetCacheCA on social media. I would love to see the results! |
1. Materials and Information
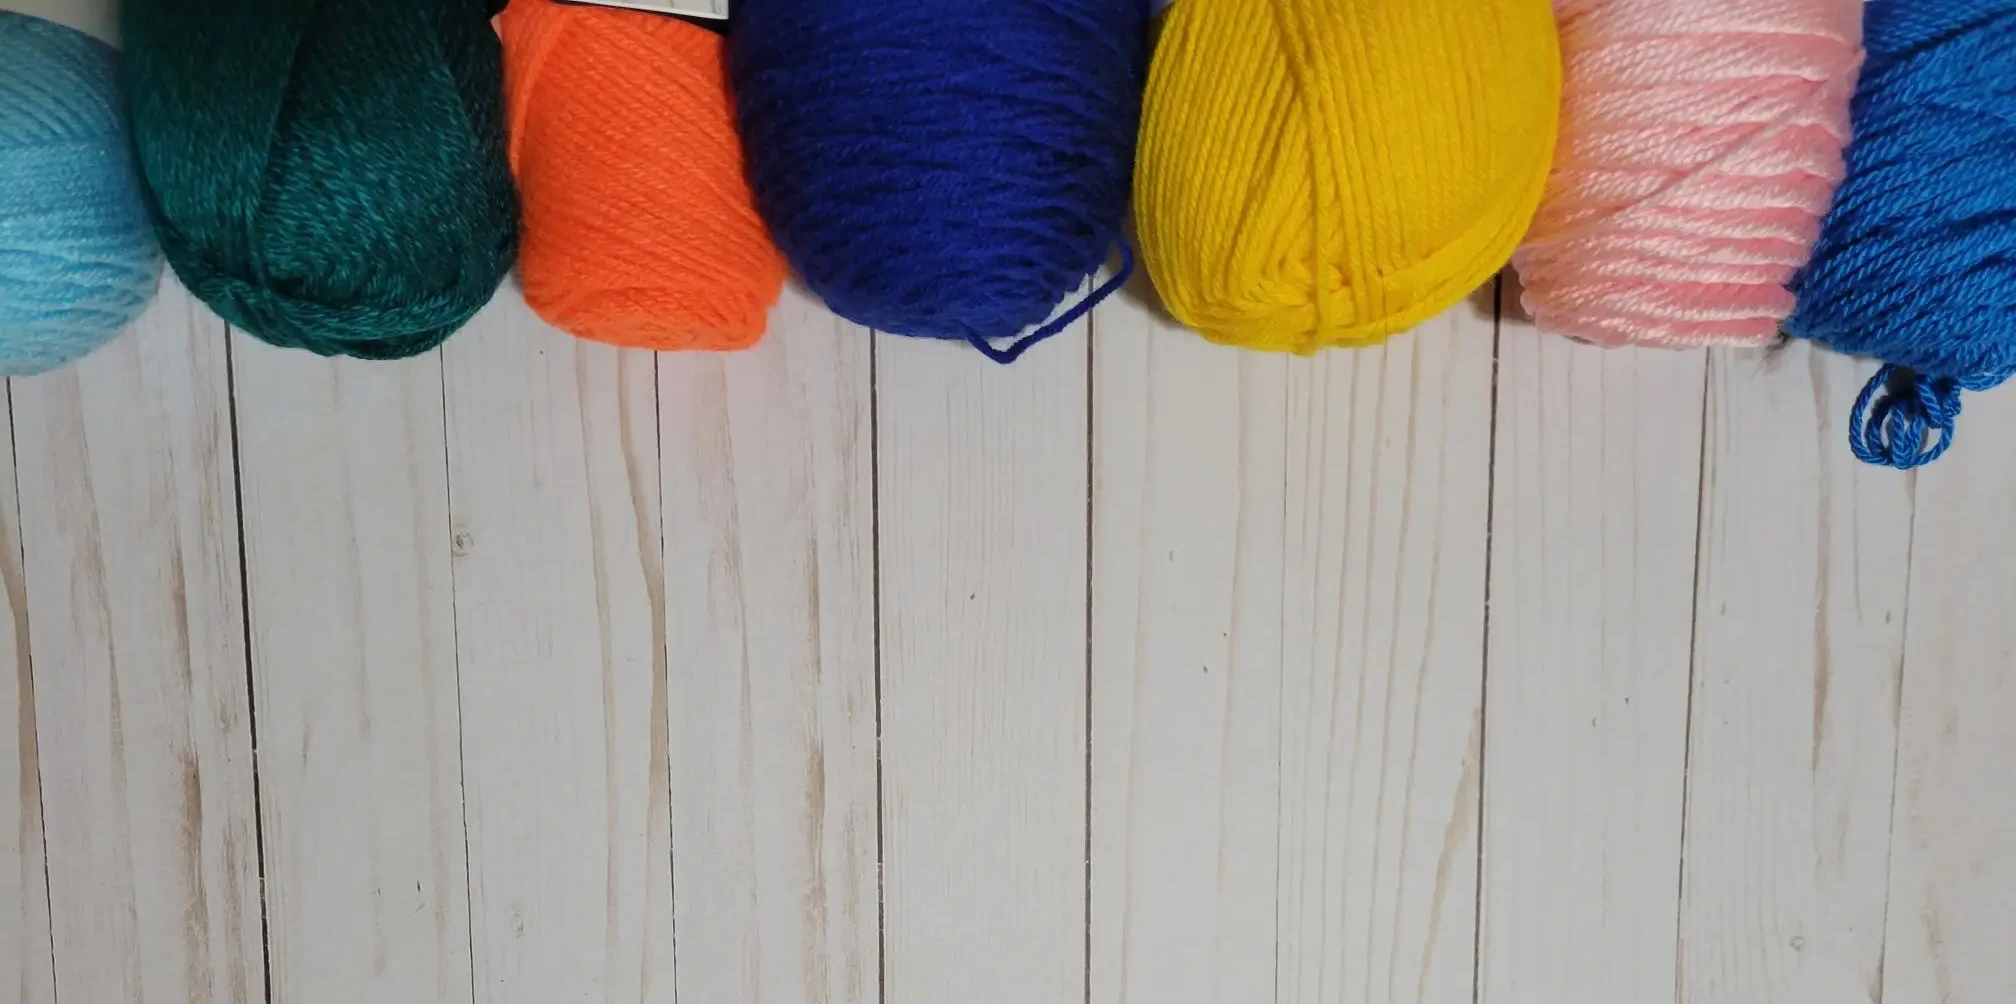
Yarns:
**All yarns are in Weight 4 - Medium / Worsted
- Aran - Bernat Premium
- Bright Yellow - Red Heart Super Saver
- Toast - Red Heart Soft
- Cherry Red - Red Heart Super Saver
- Black - Red Heart Super Saver
US Crochet Terms
Abbreviations:
- Rnd(s): Round(s)
- Row(s): Row(s)
- sc: Single Crochet
- dc: Double Crochet
- hdc:Half Double Crochet
- tr: Treble or triple Crochet
- dtr: Double Treble or Quadruple Crochet
- inv dec: Invisible decrease
- dec: Decrease
- dc dec: Double Crochet Decrease
- inc: Increase
- dc inc: Two double crochets in the same stitch
- cc: Colour Change, followed by the colour
- sl st: Slip Stitch
Additional Materials:
- - Black - Aunt Lydia's Crochet Thread - Fashion 3 (1 Super Fine)
- - Black Safety Eyes 21mm (optional)
- - Black Safety Nose 12mm (optional)
- - 25mm black buttons (optional)
- - 4.5mm crochet hook
- - Bent Yarn needles
- - Scissors
Tips:
- - Keep track of beginning of rows by using a marker
- - 4.5mm crochet hook
- - Crochet this toy with tight stitches, helps not show the stuffing through
- - To keep details such as increases, make sure to add extra stuffing in these areas as you stuff them.
Use Policies:
You may not redistribute, sell or claim this pattern in it entirety, or in part of, as your own design/pattern
You are welcome to sell finish products made from this pattern, as long as you provide credit for the pattern as 'Pattern by Crochet Cache' if posted on a social platform other than Facebook, Instagram, Twitter. Else provide credit as 'Pattern by @CrochetCacheCA' on Instagram, Twitter or Facebook.
I am not responsible for any legal repercussions that may incur, this character is not licensed by me.
Pikachu and Mimikyu are property of the Pokemon franchise, I have no ownership of this character in any way. It is property of Nintendo.
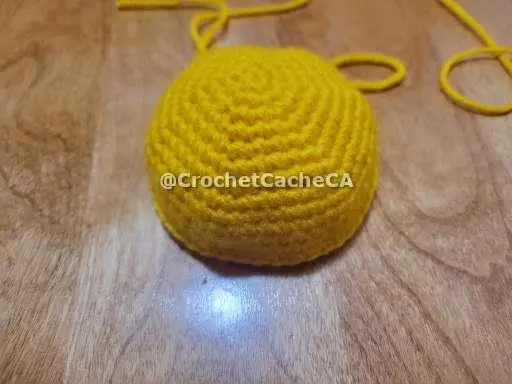
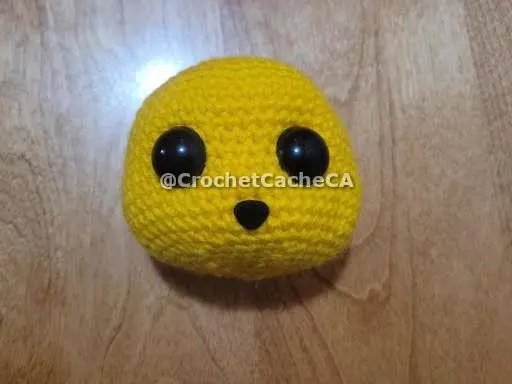
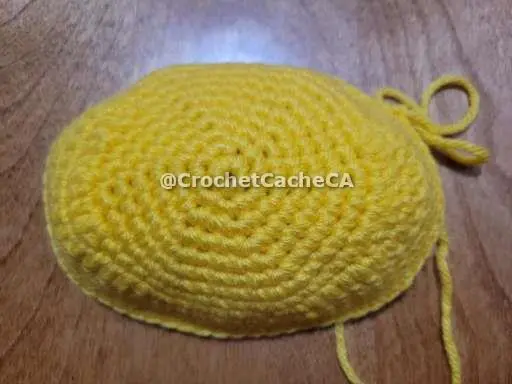
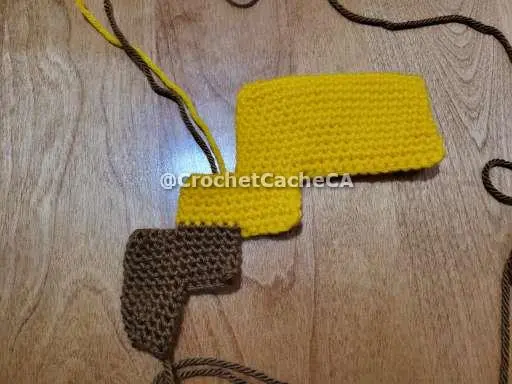
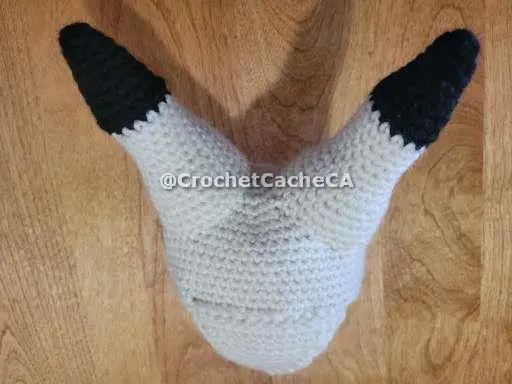
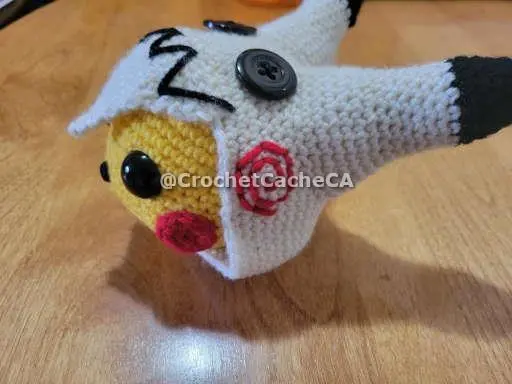
Head
| Rnd 1 | Yellow - 6sc in Magic Circle (6) |
| Rnd 2 | 6inc (12) |
| Rnd 3 | (1sc, inc) x 6 (18) |
| Rnd 4 | (2sc, inc) x 6 (24) |
| Rnd 5 | (3sc, inc) x 6 (30) |
| Rnd 6 | (4sc, inc) x 6 (36) |
| Rnd 7 | (5sc, inc) x 6 (42) |
| Rnd 8 | (6sc, inc) x 6 (48) |
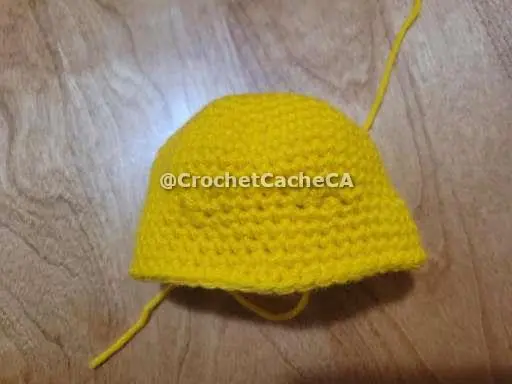
| Rnds 9-13 | 48sc (48) |
| Rnd 14 | 13sc, inc, 3sc, inv dec, tr(eye marker), inv dec, 4sc, inv dec, tr(eye marker), inv dec, 3sc, inc, 13sc (46) |
| Rnd 15 | 14sc, inc, 5sc, inc, 4sc, inc, 5sc, inc, 14sc (50) |
| Rnds 16-17 | 50sc (50) |
| Rnd 18 | 24sc, 2inc (nose location), 24sc (52) |
| Rnd 19 | 14sc, inv dec, 8sc, 2inv dec, 8sc, invdec, 14sc (48) |
| Rnd 20 | (6sc, inv dec) x 6 (42) |
| Rnd 21 | (5sc, inv dec) x 6 (36) |
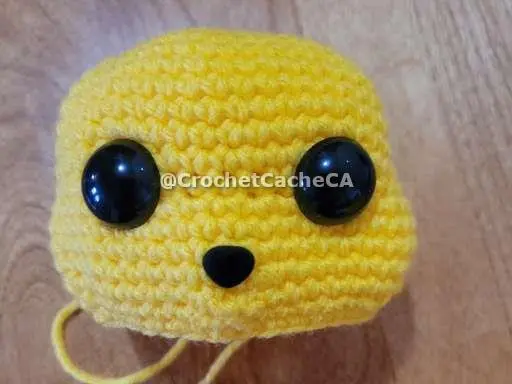
| Rnd 22 | (4sc, inv dec) x 6 (30) - Add the safety eyes and nose if using them. |
| Rnd 23 | (3sc, inv dec) x 6 (24) - Start Stuffing |
| Rnd 24 | (2sc, inv dec) x 6 (18) |
| Rnd 25 | (1sc, inv dec) x 6 (12) |
| Rnd 26 | 6inv dec (6) - sl st, Stitch the remaining 6 loops together then tighten all stitches fasten off and cut and hide remaining tail. |
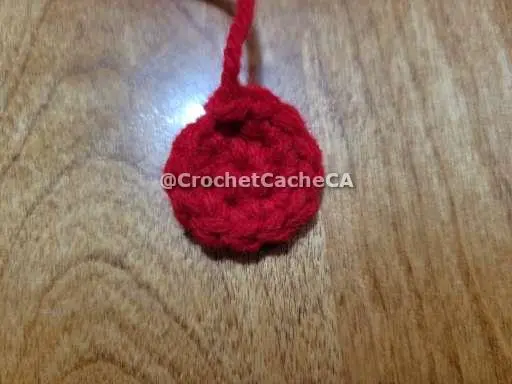
Cheeks
**Make two**
| Rnd 1 | Red - 6sc in Magic Circle (6) |
| Rnd 2 | 6inc (12) - sl st leave long tail. |
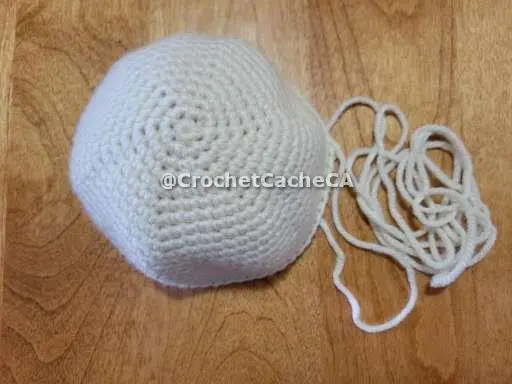
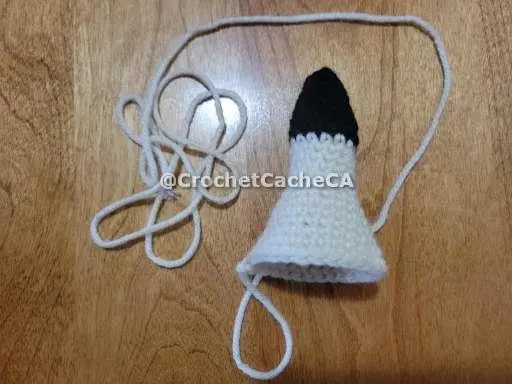
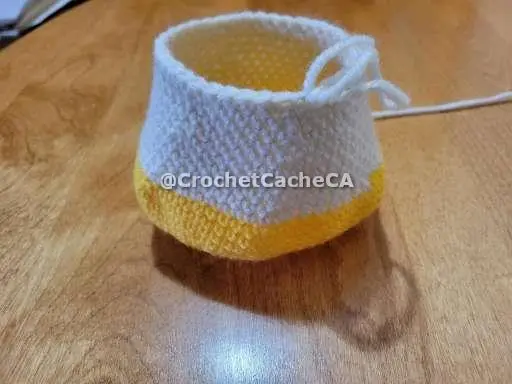
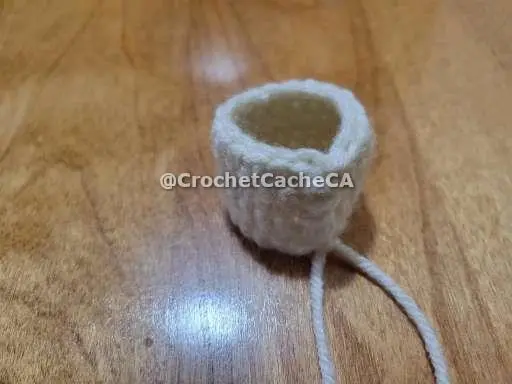
Hood for Cloak
| Rnd 1 | Aran- 6sc in Magic Circle (6) |
| Rnd 2 | 6inc (12) |
| Rnd 3 | (1sc, inc) x 6 (18) |
| Rnd 4 | (2sc, inc) x 6 (24) |
| Rnd 5 | (3sc, inc) x 6 (30) |
| Rnd 6 | (4sc, inc) x 6 (36) |
| Rnd 7 | (5sc, inc) x 6 (42) |
| Rnd 8 | (6sc, inc) x 6 (48) |
| Rnd 9 | (7sc, inc) x 6 (54) |
| Rnd 10 | (8sc, inc) x 6 (60) |
| Rnd 11 | (9sc, inc) x 6 (66) |
| Rnds 12-20 | 66sc (66) - sl st, leave long tail to attach to head. |
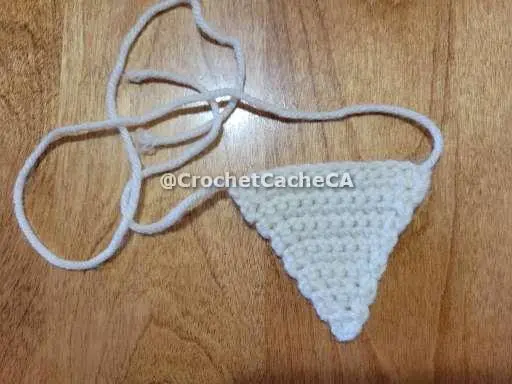
Front Flap
| Aran- Chain 15, skip loop closest to the hook, 14sc, Chain Turn (14) | |
| Row 1 | dec, 10sc, dec, Chain Turn (12) |
| Row 2 | 12sc, Chain Turn (12) |
| Row 3 | dec, 8sc, dec, Chain Turn (10) |
| Row 4 | 10sc, Chain Turn (10) |
| Row 5 | dec, 6sc, dec, Chain Turn (8) |
| Row 6 | 8sc, Chain Turn (8) |
| Row 7 | dec, 4sc, dec, Chain Turn (6) |
| Row 8 | 6sc, Chain Turn (6) |
| Row 9 | dec, 2sc, dec, Chain Turn (4) |
| Row 10 | 4sc, Chain Turn (4) |
| Row 11 | 2dec, Chain Turn (2) |
| Row 12 | 2sc, Chain Turn (2) |
| Row 13 | sl st while dec (1) - Weave the end to through the opposite side of the starting string. leave long tail for connecting to the hood/head. |
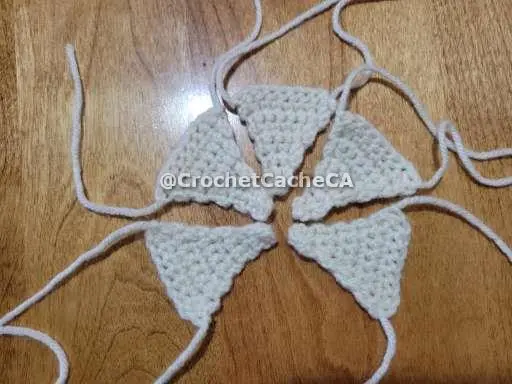
Ears
**Make two**
| Rnd 1 | Black - 3sc in Magic Circle (3) |
| Rnd 2 | 3sc (3) |
| Rnd 3 | 3inc (6) |
| Rnd 4 | 6sc (6) |
| Rnd 5 | (1sc, inc) x 3 (9) |
| Rnd 6 | 9sc (9) |
| Rnd 7 | (2sc, inc) x 3 (12) |
| Rnd 8 | 12sc (12) |
| Rnd 9 | (3sc, inc) x 3 (15) |
| Rnd 10 | 15sc (15) - cc Aran |
| Rnds 11-14 | 15sc (15) |
| Rnd 15 | (4sc, inc) x 3 (18) |
| Rnd 16 | 18sc (18) |
| Rnd 17 | (2sc, inc) x 6 (24) |
| Rnds 18-19 | 24sc (24) |
| Rnd 20 | (3sc, inc) x 6 (30) |
| Rnds 21-22 | 30c (30) - sl st, leave long tail to attach to head |
Body
| Rnd 1 | Yellow - 6sc in Magic Circle (6) |
| Rnd 2 | 6inc (12) |
| Rnd 3 | (1sc, inc) x 6 (18) |
| Rnd 4 | (2sc, inc) x 6 (24) |
| Rnd 5 | (3sc, inc) x 6 (30) |
| Rnd 6 | (4sc, inc) x 6 (36) |
| Rnd 7 | (5sc, inc) x 6 (42) |
| Rnd 8 | 6sc, 2inc, 2sc, dc, inc dc, dc, inc dc, dc, inc dc, 16sc, inc dc, dc, inc dc, dc, inc dc, dc, 2sc, 2inc (52) |
| Rnd 9 | 9sc, 16dc, inc, 9sc, inc, 16dc (54) |
| Rnd 10 | 10sc, inc, 7sc, inc, 7sc, inc, 10sc, inc, 7sc, inc, 7sc, inc (60) |
| Rnds 11-13 | 60sc (60) |
| Rnd 14 | (8sc, inv dec) x 6 (54) CC to Aran |
| Rnd 15 | 54sc (54) |
| Rnd 16 | (7sc, inv dec) x 6 (48) |
| Rnds 17-19 | 48sc (48) |
| Rnd 20 | (6sc, inv dec) x 6 (42) |
| Rnds 21-23 | 42sc (42) |
| Rnd 24 | (5sc, inv dec) x 6 (36) |
| Rnds 25-27 | 36sc (36) - sl st, leave long tail to attach to the head. |
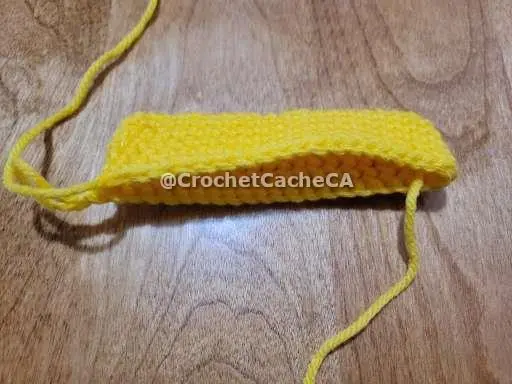
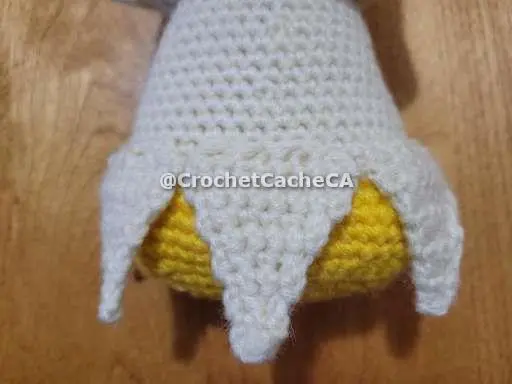
Bottom of Cloak
**Make Six**
| Aran- Chain 11, skip loop closest to the hook, 10sc, Chain Turn (14) | |
| Row 1 | dec, 6sc, dec, Chain Turn (8) |
| Row 2 | 8sc, Chain Turn (8) |
| Row 3 | dec, 4sc, dec, Chain Turn (6) |
| Row 4 | 6sc, Chain Turn (6) |
| Row 5 | dec, 2sc, dec, Chain Turn (4) |
| Row 6 | 4sc, Chain Turn (4) |
| Row 7 | 2dec, Chain Turn (2) |
| Row 8 | 2sc, Chain Turn (2) |
| Row 9 | sl st while dec (1) - Weave the end to through the opposite side of the starting string. leave long tail for connecting to the body. |
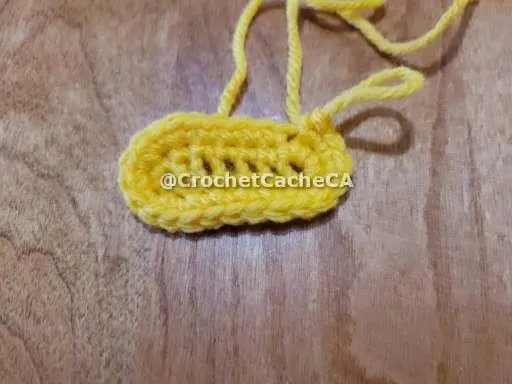
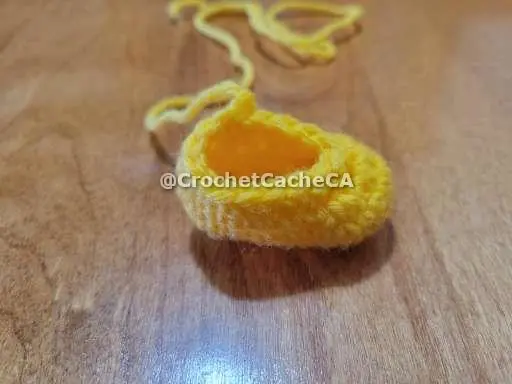
Feet
**Make two**
| Yellow - Chain 7, Starting in 2nd loop from the hook, 6sc, 3sc in the same loop, 5sc, inc (16) | |
| Rnd 1 | inc, 4sc, 5inc, 4sc, 2inc (24) |
| Rnds 2-3 | 24sc (24) |
| Rnd 4 | 4sc, 5inv dec, 6sc, inv dec, 2sc (18) |
| Rnd 5 | 4sc, 3inv dec, 8sc (15) - sl st, leave long tail to attach to body |
Arms
**Make two**
| Rnd 1 | Yellow - 6sc in Magic Circle (6) |
| Rnd 2 | 6inc (12) |
| Rnds 3-11 | 12Sc (12) - sl st, leave long tail to attach to body |

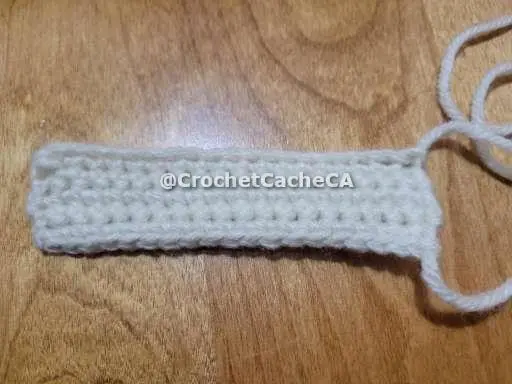
Sleeves
**Make two**
| Aran - Chain 20, skip stitch closest to the hook, 19sc, Chain Turn (19) | |
| Rnd 1-4 | 19sc, Chain Turn (19) - sl st, leave long enough tail to attach the side together and to attach sleeve to the body. |
Tail
| Yellow - Chain 21 | |
| Rnd 1 | Starting 2nd loop from the hook, 19sc, 3sc in same loop, 18sc, inc (42) |
| Rnds 2-11 | 42sc (42) |
| Rnd 12 | Crochet through both side of the tail connecting them as you SC throught them. Do this for 15 stitches, 6sc through one side of the tail. Chain 12, sc connecting back to the loop after you started chaining, 5sc (24) |
| Rnds 13-17 | 24sc(24) |
| Rnd 18 | Crochet through both side of the tail connecting them as you sc throught them. Do this for 6 stitches, cc Brown, 5sc through one side of the tail. Chain 12, sc connecting back to the loop after you started chaining, 5sc (24) |
| Rnd 19-23 | 24sc (24) |
| Rnd 24 | Crochet through both side of the tail connecting them as you sc throught them. Do this for 6 stitches, 12sc around the remaining open work. |
| Rnds 25-28 | 12sc (12) |
| Rnd 29 | 2sc, inv dec, 4sc, inv dec, 2sc (10) |
| Rnd 30 | 10sc (10) |
| Rnd 31 | 2sc, inv dec, 2sc, inv dec, 2sc (8) - sl st, leave long tail to attach to body, enough to stitch around the whole brown of the tail to attach it to the body. |
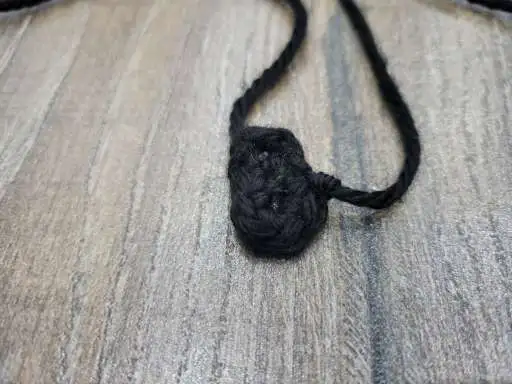
Mimikyu' Eyes
**Make two**
| Black- Chain 3, skip stitch closest to the hook, sc, 3sc in same stitch, inc (6) - sl st, leave long tail to attach to the stomach |
Assembly
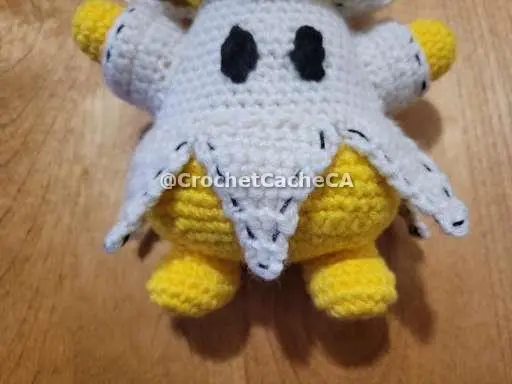
- - Stitch on the cheeks on the side of the face
- - Put the Cloak Hood at the back of the head and attach around to the head using the Aran yarn. Attach at the bottom of the head and the beside the eyes and at the top of the head, leave gaps around the cheeks.
- - Attach the front flap so that the point is between Pikachu's eyes.
- - Attach the ears towards the back to leave room for the details of Mimikyu's face.
- - Attach the buttons just in front of the ears.
- - Using the black yarn stitch a zig-zag for the mouth.
- - Using the red yarn stitch a swirl for the cheeks at the sides of cloak hood.
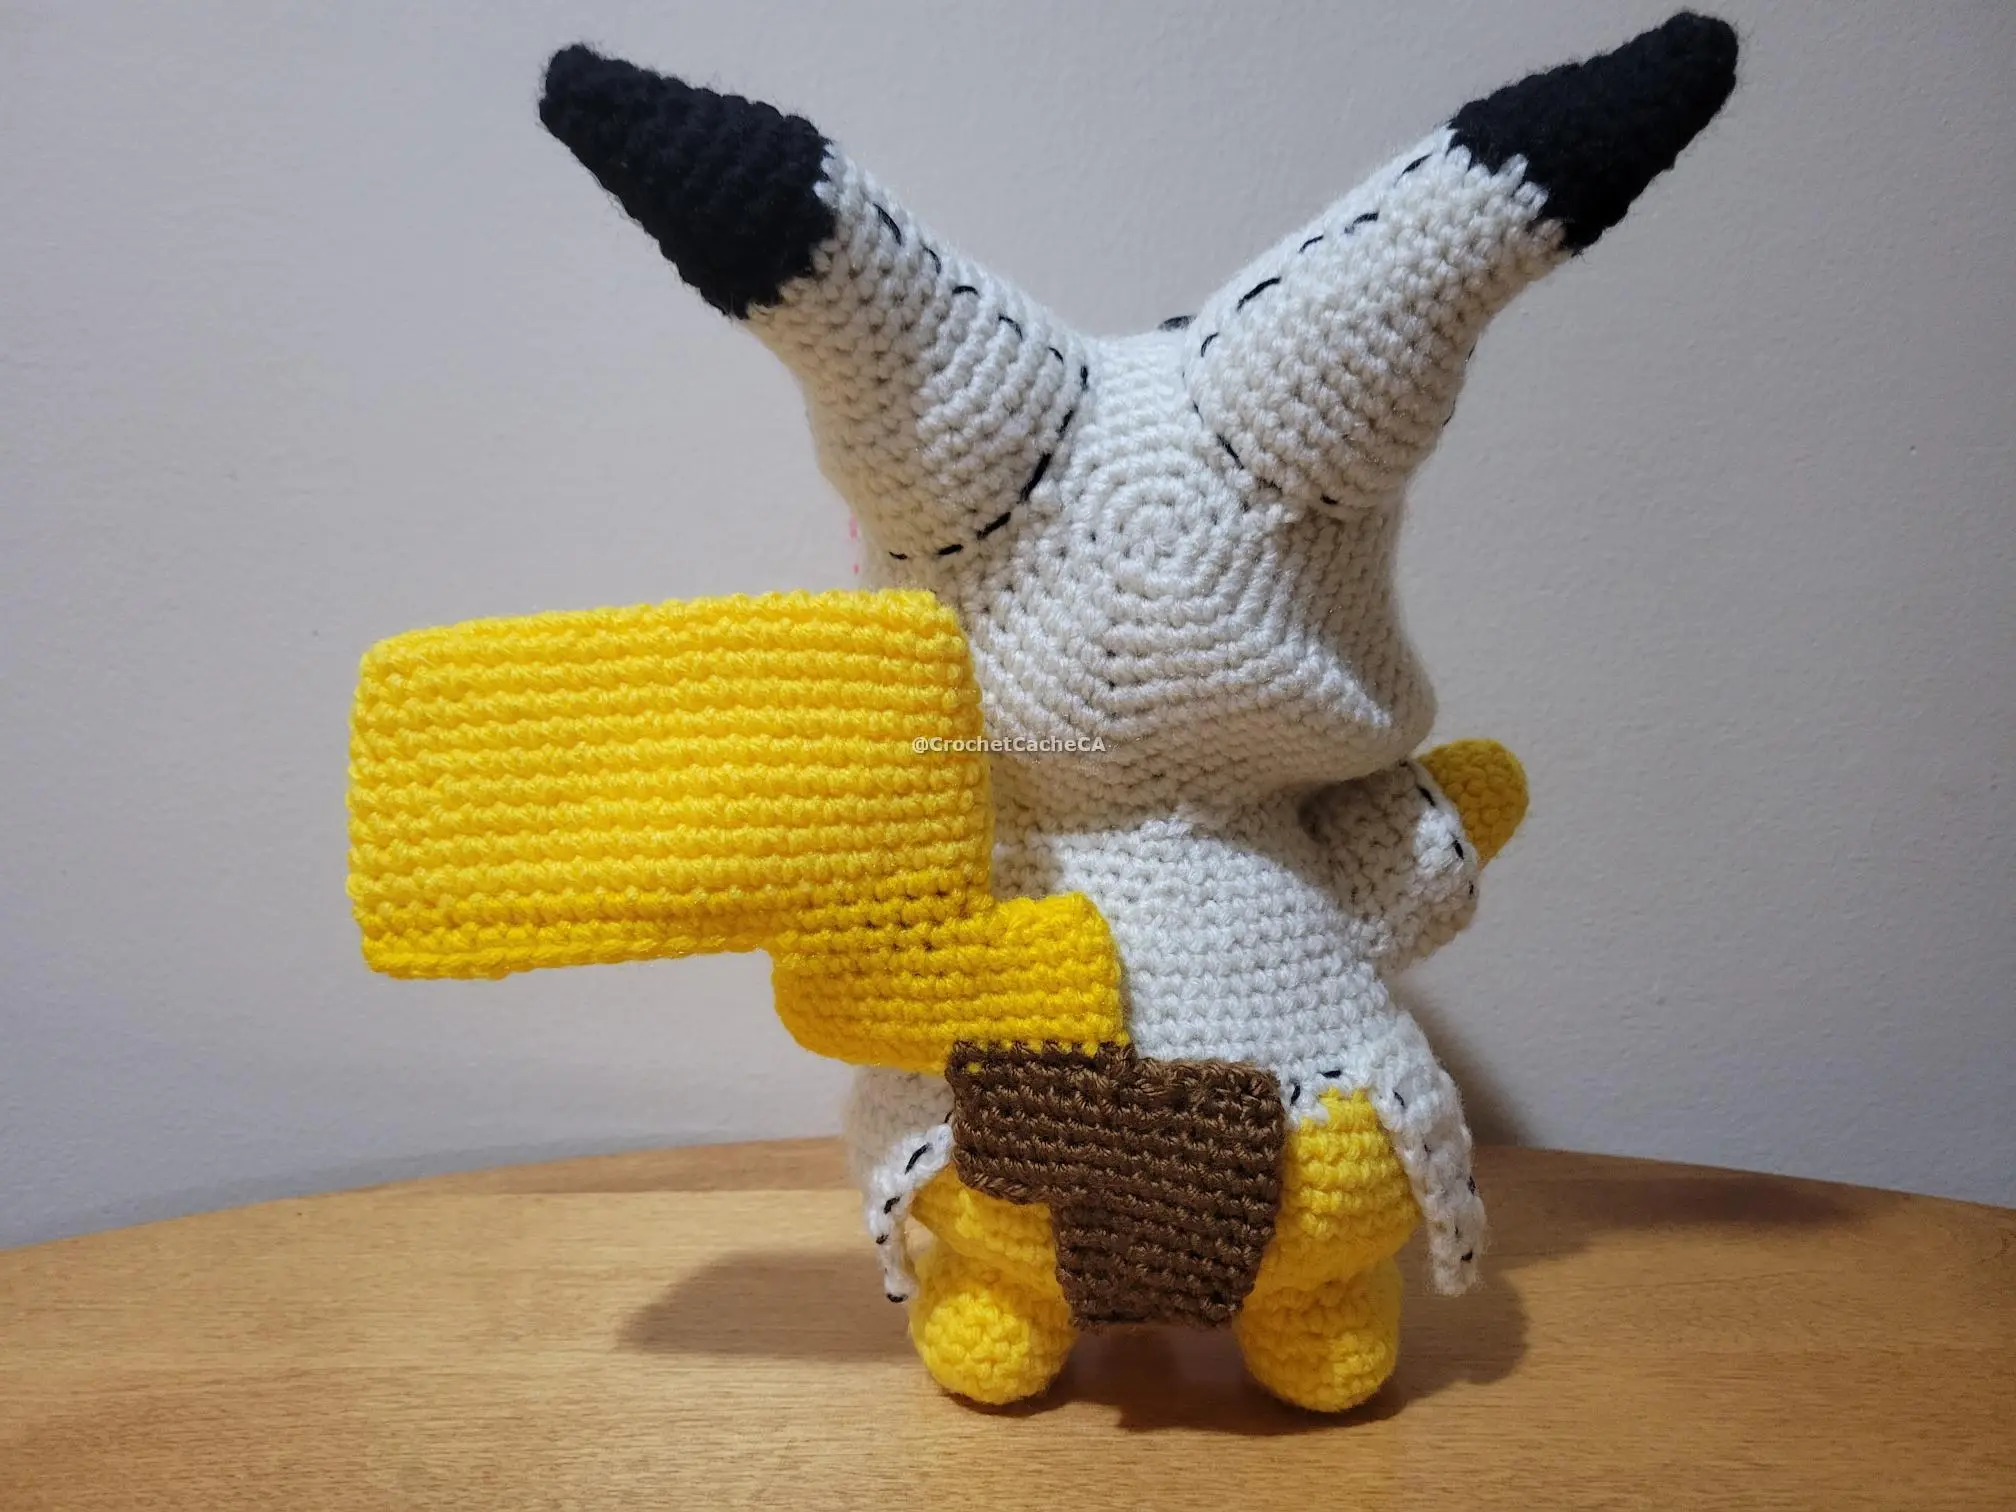
- - Attach body to the head
- - Attach the Bottom Flaps pointing down along the colour change of the body.
- - Attach the arms at the sides of the body, leave space from the head to the arm to attach the sleeves.
- - Feed the arm through the sleeve and attach to the body.
- - Attach the Mimikyu eyes at the front of the body.
- - Add stitching details to the cloak to add extra details, I believe it makes it look more like a costume.
- - Attach the feet to the bottom, pointing them forward and evenly spaced.
- - Attach the tail at the back under the colour change. Stitch all around the brown of the tail.
YOUR DONE!

Conclusion